Lily Munster Gothic Ruched Cloak Tutorial
Okay, this might not be as much tutorial as 'Follow along as I tell you how I winged-it'. Some steps may not have as many photos, or informative ones as would be desired, since I sort of just took them as I went, trying to guess what would be useful when explaining my insane methods later. Perhaps useful? I hope so. I've taken advantage of many, many tutorials and free patterns on the internet over the years, and I'd like to think that sometimes I give back a little.
So without further ado,

-Elastic (I used 3/4in No Roll Poly Elastic. I recommend using NO SMALLER width. We're using this in lieu of binding, so make sure it's a thick, resilient elastic. There's not as much pressure on it as a waistband or other general employments of elastic, but it still needs to be able to handle the weight of the fabric without stretching out.)
-Thread
-Scissors
-Rotary Cutter & Mat (optional, but does make life easier... if you quilt, you'll already have this around.)
-Sewing Machine

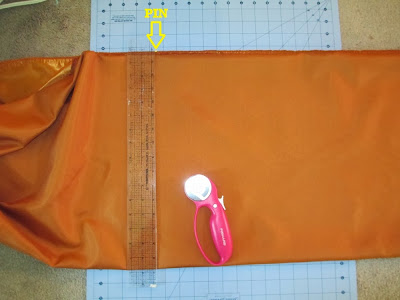
2.) Measure out 120 inches along selvage/length of fabric. Mark.(I used a pin.)

3.) Fold fabric in half, bringing selvages together. Fold in half again (bringing folded edges to selvages). Your fabric is now 4 layers thick.

4.) Place cutting mat beneath fabric,lining up folded edge on gridlines so that it is straight (selvage should run nice and parallel if you've folded the fabric correctly... mostly... sometimes the bias is off on fabrics causing them to pull/skew.)
5.) Cut with ruler/straight edge and rotary cutter. *Or draw striaght line with ruler/straight edge and cut with shears. YOU NOW HAVE A PIECE THAT IS 120 INCHES LONG BY 60 INCHES WIDE.
6.) Repeat steps 1 through 5 so that you have TWO pieces 120in x 60in.
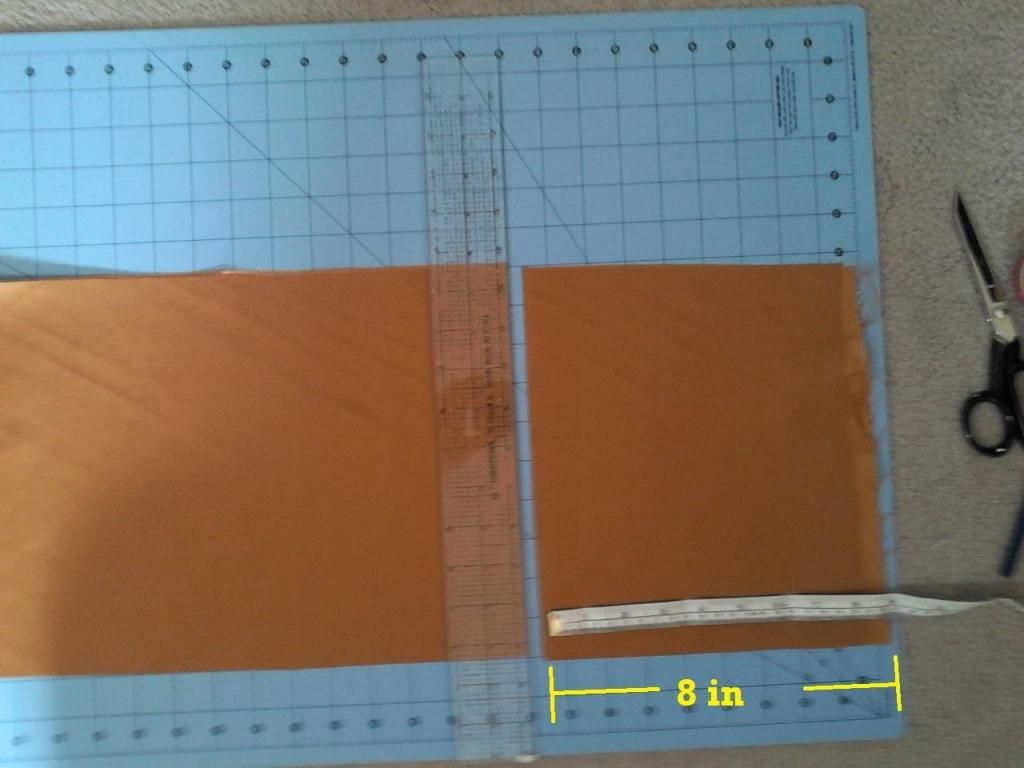
7.) Measure out 32 inches along selvage. Mark. Fold fabric and cut same as with previous two pieces. YOU NOW HAVE TWO LARGE PIECES (120 INCHES BY 60 INCHES) AND ONE SMALL PIECE (32 INCHES BY 60 INCES).
8.) Take ONE of the two LARGE pieces. Keep folded in half lengthwise (so that selvages meet and folded piece is 30 inches wide), and bring raw edges together. Folded piece is now 60 inches by 30 inches wide. Repeat folding in half in the same direction until your folded piece is just 15in x 30in (with the selvages together and running down right side). Measure out 20 inches from folded edge. Mark.
 Place on cutting mat, straightening as before and cut at mark. Set aside 10 inch wide pieces. Remember how we folded the fabric in half lengthwise? That means we now have TWO 10 inch by 120 inch pieces. These are the CENTER FRONT pieces. (We will shape them later).

9.) Slide folded 20inch wide piece over on matt (left from cutting CENTER FRONT pieces) and trim off folded edge so that you now have two pieces that measure 20 inches by 120 inches. These are the SIDE PIECES. Unfold, but keep two pieces together.

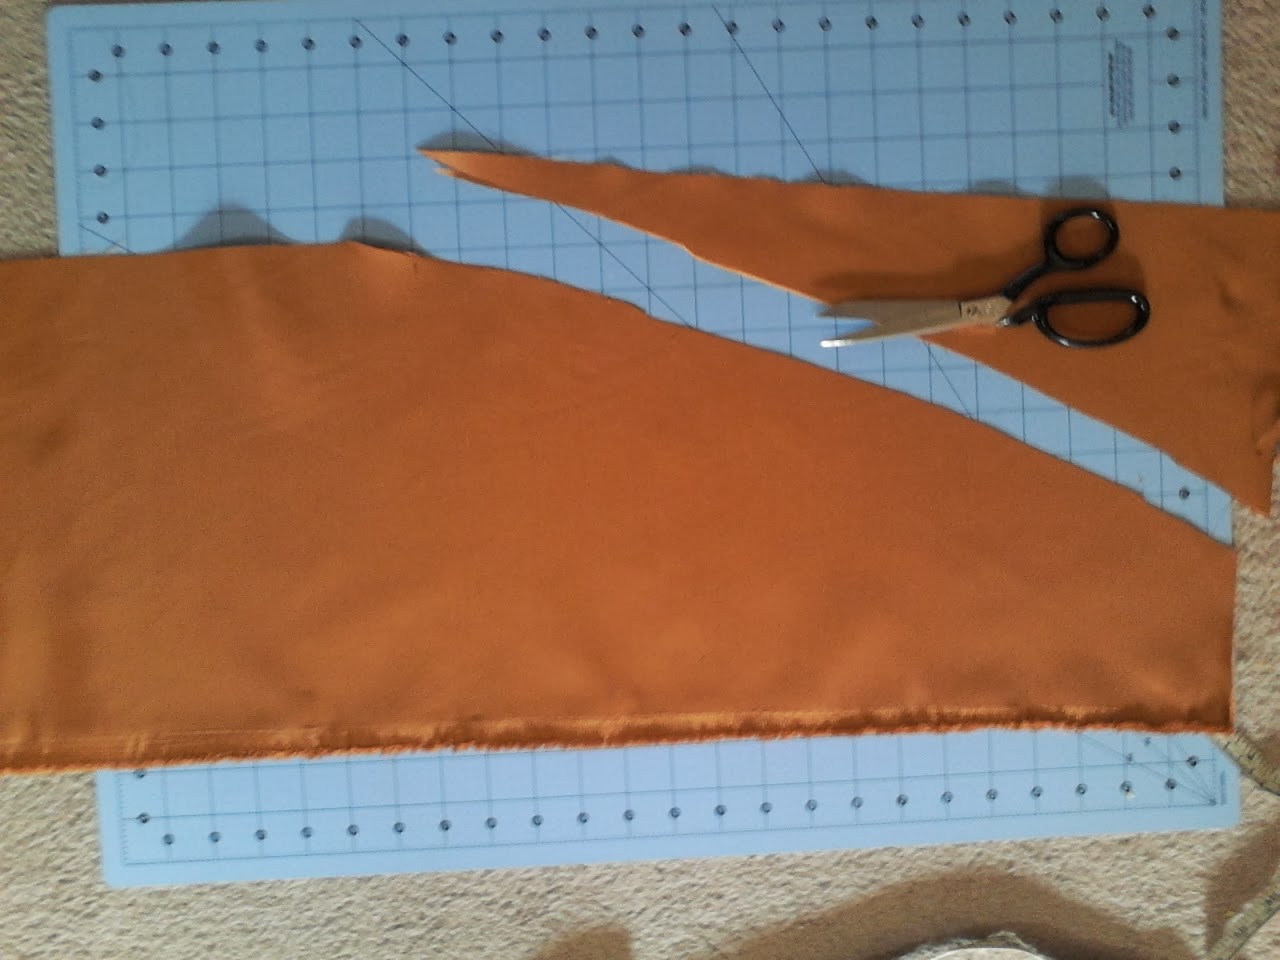
10.) TO SHAPE SIDE PIECES: With raw edges aligned, lay out the SIDE PIECES, one on top of the other. Fold in half lengthwise (your piece is now about 10 inches wide) Measure 7.5 inches from fold and mark. Measure about 40 inches down the length of piece. Cut along length beginning at original mark to 40-inch mark, sloping gently so the you have a tapered piece. Unfold.

11.) Mark SIDE PIECES, 8 inches from raw edge of tapered end. Starting at opposit end, cut lengthwise along fold until you reach that 8 inch mark. Open. You now have the two SIDE PIECES, shaped and all set to go. Put aside.

12.) To shape CENTER FRONT pieces, Place pieces one on top of another, have all edges even. Measure down 18 inches. This will be the center of the cloak where the ties go, at the sternum. For me, the finished cloak should sit about 9 inches from the shoulder. Because we're using the double-fabric formula for extra deep ruching, I doubled this measure for 18 inches. (The same goes with any vertical measurments I've been making for these pieces). Mark the width of the piece at the shoulder. About 4 inches (taking into account hem/seam allowances). Again, cut pieces starting at raw edge mark and gently sloping until you meet the 18 inch mark (more or less). You now have TWO SHAPED CENTER FRONT PIECES. Set aside.

13.) Now for the other 120in x 60in piece. Again, keep folded in half lengthwise, with selvages together, and bring raw edges together (like folding blankets). Keep folding in half until you have a manageable piece, as in step 8.
14.) This time, Measure from folded edge 5 inches. Mark. Cut with rotary. Open out piece. You now have ONE 120in x 10in piece.

We will now reduce the width at the top of the piece for a bit of taper. Fold in half lengthwise. Mark 3.5 inches from fold. Cut lengthwise, gently sloping as before. Where you meet the 10 inch width is not extremely important. Only that we've reduced the bulk on the neck edge. You now have ONE BACK PIECE.
14.) Now for the side gores (that will go into that slit we made in the SIDE PIECES). Back to the mat. Take your still folded piece (which you cut the back piece from). Measure 10 inches from the cut edge. Cut with rotary.
 To shape, unfold so that you only have a single layer of thickness of each piece (there are two pieces after cutting). Since we left 8 inches on the top of the SIDE PIECES, the gores will be 8 inches too long if we just insert them as is. So Let's take 8 inches off the length of the pieces.
 Now let's taper these pieces, too. Fold in half length-wise. Round off end. Now we have TWO SIDE GORES.


15.) Almost done cutting. Just the hood pieces! This is a whole lot of guesswork for me, so we'll see the result, and may have to come back and add notes to this step. I'm going to see if straight rectangles might not suffice. Okay. Ready? Take your 32in x 60 in piece. Fold it in half so that the selvages are together and it is only 30 inches wide. Bring raw edges together. Your folded piece is now approximately 30in x 15in. Align on mat. Cut selvages off (if desired, because we have a bit of fabric to work with here). Measure 10 inches (this is what you may want to increase for a more roomy hood) from raw/unfolded edge. Cut. You now have TWO SIDE HOOD PIECES.
 Measure 5 inches from FOLDED edge of remainder. Cut. Unfold. You now have ONE HOOD BACK piece.
YOU'RE FINISHED CUTTING! YAY!
Okay, I lied. You're finished cutting fabric. Now you have to CUT ELASTIC.

Look, I did the math, so you don't have to (don't you love me?)
CUT THE FOLLOWING LENGTHS OF ELASTC:
4 @ 60 inch (Back & Side seams)
2 @ 50 inch (Center Front)
2 @ 120 inch (Gores)
2 @ 10 inch (Arm Holes)
2 @ 20 inch (Hood seams)
1 @ 30 inch (Hood front) *adjust if you decide to increase the width of the hood pieces*
1 @ 18 inch (Neck Band)
OR
If you're lucky enough to have an overlock/serger, NARROW HEM the HOOD PIECES ONLY and serge the rest of long sides of the rest of the pieces.
Don't worry about puckers or mess. The extreme ruching will hide these!
Several hours later... (just kidding, it only take about an hour or so... just seems like forever!)

2.) NARROW HEM bottom edge of all Cloak pieces, and top edge of all hood pieces.

3.) Let's start assembling by putting the gore into the side pieces first. Pin the elastic along the inside (the part you slashed) of the side piece, where the gore will be attached. You might have noticed that your fabric is TWICE AS LONG as your elastic. You can just sew and stretch the elastic as you go and hope for the best, but I like to mark it in several places by pinning the elastic to the fabric....
TO PIN: First pin the ends of the elastic to the ends of the fabric. Next find the middle of the elastic and the middle of the fabric (in this case, the top of the slash) and pin. Find halfway between the Middle Pin and the End Pin on one side for both the fabric and elastic. Pin together. Repeat for other side. Continue pinning until you are satisfied. I only used about 7 pins in this case.
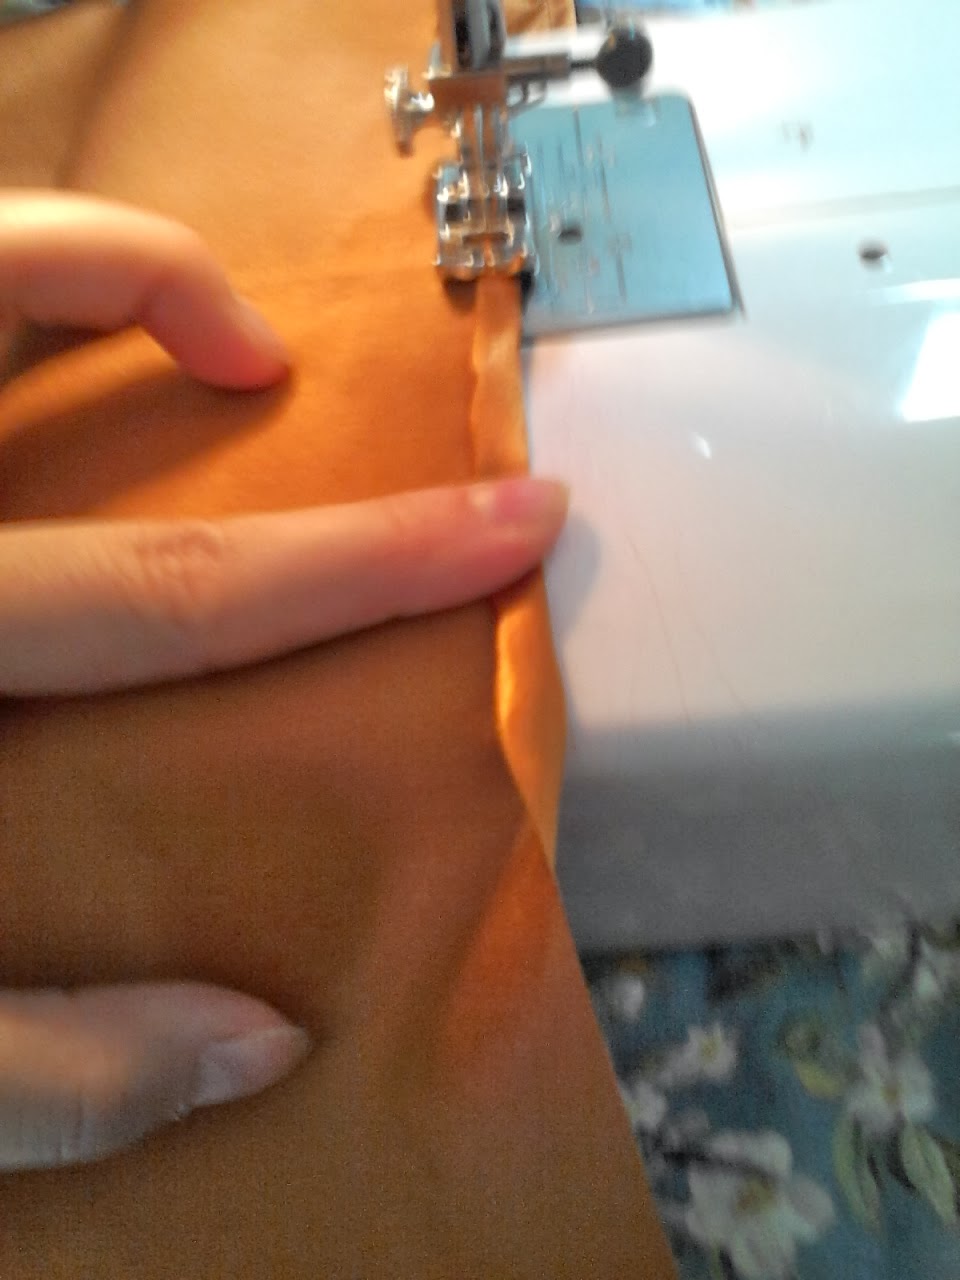
TO SEW: Make sure your needle is sunk into the fabric whenever you stop. Your feed-dogs will not work in this case, since you are stretching the elastic as far as it will go so that the fabric lies smoothly on top (I was lucky in that I guessed double-the-fabric to elastic length ratio and the elastic I got does actually stretch exactly double) and the pressure of your tugging on the fabric will yank the material right out of the machine and counter the feed dogs operation, because you are stronger than your precious little sewing machine. You will have to feed the fabric yourself, pulling the elastic taut with one hand and gripping the fabric behind (after) the needle and pulling gently, maintaining the rate at which your sewing machine operates. This is where being best friends with your sewing machine comes in handy. If you've spent a lot of time with your machine, you will instinctively know the rate at which it feeds for each stitch setting, and guide the fabric and elastic through without much issue. Pulling/Feeding it too quickly will place pressure on the needle, bending it and causing it to hit the needle plate and break. However, even if you have a bizarre mental bond with your sewing machine, you will probably still break a couple of needles in this project. Be patient!
Breaking it down more completely...
First, I place the end of the fabric and elastic (we are sewing from the fabric side, so the elastic is beneath the fabric) under the presser foot, and lock it down. Since we are at the edge of the fabric, there is nothing for us to grip to help feed the fabric through. So next, I bunch up some of the fabric on top of the elastic, without stretch the elastic yet, and sew about an inch. Now we have fabric to grip and help feed through the machine.
 Next, manually lower the needle so that it is firmly embedded in the fabric and elastic. Now to stretch the elastic. (I placed pins at about an arms length from one another while securing the elastic to the fabric.) While your machine is helpfully holding onto the fabric-elastic, find your next pin and grab the spot (holding both elastic and fabric firmly), and stretch to the limit, or until your fabric is lying smooth (so that it looks like you have equal lengths of elastic and fabric). Depending on your elastic and the fabric, you may still have extra fabric even when the elastic is fully stretched. Don't worry too much about this. Since this is far too long a segment to manage, I find the middle of the length, grip elastic and fabric firmly between thumb and forefingers, and sew until this point. Keep your hold on the fabric and stretched elastic, making sure the elastic is fully stretched, while you grab the tail (already sewn, behind the needle) and feed the fabric as your machine sews. When you reach the end of the segment, make sure the needle is fully embedded in the fabric and elastic so the machine will hold it for you as you pick up another segment to stretch.

If you have more fabric than your elastic will stretch to accomodate, stop every so often (easiest at the end of sewing a segment), and bunch up/gather some of the fabric and sew to the elastic as we did in the very beginning.
Continue stretching and sewing (and gathering, if need be) until you've completed the entire length of the elastic/fabric. Near the end, you will not be able to grip the fabric/elastic to stretch it, so simply gather/bunch the fabric up and sew. Finish with backward-forward locking stitches, as usual. When you release the elastic, the fabric will bunch and look like it's been gathered/ruched (this is the effect we desire).
TO FINISH GORE: Take the gore piece and pin to the other edge of the elastic that you just sewed to the slashed part of the side pieces. Stretch and sew as before. The elastic should be laying against the right side (shiny side in the case of satin) or 'outside' of the cloak. The finished/narrow-hemmed edges of the fabric should be on the inside.
4.) Attach SIDES to BACK as you did with the gore.
5.) Attach FRONTS to SIDES. You will have one big piece that looks like this...

6.) Finish FRONTS. Lily Munster's cloak looks as if it tapers up, meaning the front pieces are 'shorter' at the center front. This is easily achieved simply by cutting a shorter piece of elastic. I went with 50inches instead of 60 inches, but I think I'd recommend going even shorter, since the back sort of trains out/drags on the ground and you want the center front up off the ground.
At any rate... First measure down from the shoulder to determine the desired finished length of the center front.
 Cut elastic accordingly, and sew (as before, maybe with extra bunching/gathering excess).

7.) Assembly HOOD as follows: Sew 20 inch (you could probably reduce this to 15 inches for better gathers and less awkward form in finished cloak) elastic between three segments of HOOD, stretching to fit as with the cloak pieces, elastic on the outside/right side of the fabric.

 Sew 30 inch elastic along Hood Front edge (narrow hemmed edge).

8.) Finish neck edges on cloak and hood by serging/overlocking or narrow hemming.
9.) ATTACH HOOD by first pinning elastic along neck edge of cloak. You will not need to stretch the elastic. Do not gather up or bunch fabric to the elastic either, along the front and back. The side pieces will need to be gathered to fit the remaining elastic length. Sew without stretching.

Pin bottom edge of hood to elastic, gathering up excess (you will have to gather a BUNCH, since we made the hood rectangular shaped, and hood are generally contour-shaped for a reason, ie to fit the neckline). Sew.
10.) Mark and Attach ties at centerfront. Her ties sit just above the bust, where you'd take an overbust measurement. I used black satin ribbon, sewing them to the underside of the elastic.
11.) ARMHOLES. Try on, mark position for armholes (they belong between the front piece and side piece). You could guess ahead of time and leave the gap when you sewed the front to the side pieces, but with all the gathering, this was more accurate for me. Take out stitching on SIDE PIECE(s).
 Reinforce with extra stitching at ends where you pulled stitches out of the elastic so the rest of the fabric will not come undone/pull away. Apply 10 inch pieces of elastic to the segments you just detached from the side piece, stretching and gathering as before, so the the armhole also has ruching and is finished with black elastic.
12.) The satin fabric tends to curl out at the bottom so that the inside is exposed.

To correct this, TURN UNDER an inch or more (depending on desired length of cloak), and tack at elastic seams/ribs. I would suggest more than I did, since it obviously is still curling up in my costume photos. This also might not be such a big deal if a softer satin is used. Maybe give it a press with the iron, too.

13.) ROCK IT LILY MUNSTER STYLE!!

So without further ado,
LILY MUNSTER'S COFFIN CLOAK: A Cheater's Guide to Ruching

MATERIALS:
-Satin Fabric (Bronze/Copper/Gold for authentic costume reproduction). I ordered mine online, and it's a little stiffer than the original piece seems to be. Go with a lighter-weight/softer satin for more authentic drape.
-Elastic (I used 3/4in No Roll Poly Elastic. I recommend using NO SMALLER width. We're using this in lieu of binding, so make sure it's a thick, resilient elastic. There's not as much pressure on it as a waistband or other general employments of elastic, but it still needs to be able to handle the weight of the fabric without stretching out.)
-Thread
-Scissors
-Rotary Cutter & Mat (optional, but does make life easier... if you quilt, you'll already have this around.)
-Sewing Machine
CUTTING PIECES:
1.) Roll out fabric (mine came on a roll, anyway).

2.) Measure out 120 inches along selvage/length of fabric. Mark.(I used a pin.)

3.) Fold fabric in half, bringing selvages together. Fold in half again (bringing folded edges to selvages). Your fabric is now 4 layers thick.

4.) Place cutting mat beneath fabric,lining up folded edge on gridlines so that it is straight (selvage should run nice and parallel if you've folded the fabric correctly... mostly... sometimes the bias is off on fabrics causing them to pull/skew.)
5.) Cut with ruler/straight edge and rotary cutter. *Or draw striaght line with ruler/straight edge and cut with shears. YOU NOW HAVE A PIECE THAT IS 120 INCHES LONG BY 60 INCHES WIDE.

6.) Repeat steps 1 through 5 so that you have TWO pieces 120in x 60in.
7.) Measure out 32 inches along selvage. Mark. Fold fabric and cut same as with previous two pieces. YOU NOW HAVE TWO LARGE PIECES (120 INCHES BY 60 INCHES) AND ONE SMALL PIECE (32 INCHES BY 60 INCES).
8.) Take ONE of the two LARGE pieces. Keep folded in half lengthwise (so that selvages meet and folded piece is 30 inches wide), and bring raw edges together. Folded piece is now 60 inches by 30 inches wide. Repeat folding in half in the same direction until your folded piece is just 15in x 30in (with the selvages together and running down right side). Measure out 20 inches from folded edge. Mark.


9.) Slide folded 20inch wide piece over on matt (left from cutting CENTER FRONT pieces) and trim off folded edge so that you now have two pieces that measure 20 inches by 120 inches. These are the SIDE PIECES. Unfold, but keep two pieces together.

10.) TO SHAPE SIDE PIECES: With raw edges aligned, lay out the SIDE PIECES, one on top of the other. Fold in half lengthwise (your piece is now about 10 inches wide) Measure 7.5 inches from fold and mark. Measure about 40 inches down the length of piece. Cut along length beginning at original mark to 40-inch mark, sloping gently so the you have a tapered piece. Unfold.

11.) Mark SIDE PIECES, 8 inches from raw edge of tapered end. Starting at opposit end, cut lengthwise along fold until you reach that 8 inch mark. Open. You now have the two SIDE PIECES, shaped and all set to go. Put aside.

12.) To shape CENTER FRONT pieces, Place pieces one on top of another, have all edges even. Measure down 18 inches. This will be the center of the cloak where the ties go, at the sternum. For me, the finished cloak should sit about 9 inches from the shoulder. Because we're using the double-fabric formula for extra deep ruching, I doubled this measure for 18 inches. (The same goes with any vertical measurments I've been making for these pieces). Mark the width of the piece at the shoulder. About 4 inches (taking into account hem/seam allowances). Again, cut pieces starting at raw edge mark and gently sloping until you meet the 18 inch mark (more or less). You now have TWO SHAPED CENTER FRONT PIECES. Set aside.
13.) Now for the other 120in x 60in piece. Again, keep folded in half lengthwise, with selvages together, and bring raw edges together (like folding blankets). Keep folding in half until you have a manageable piece, as in step 8.
14.) This time, Measure from folded edge 5 inches. Mark. Cut with rotary. Open out piece. You now have ONE 120in x 10in piece.

 |
| My camera battery died, so photos taken with Samsung Galaxy vary in quality. |
14.) Now for the side gores (that will go into that slit we made in the SIDE PIECES). Back to the mat. Take your still folded piece (which you cut the back piece from). Measure 10 inches from the cut edge. Cut with rotary.


15.) Almost done cutting. Just the hood pieces! This is a whole lot of guesswork for me, so we'll see the result, and may have to come back and add notes to this step. I'm going to see if straight rectangles might not suffice. Okay. Ready? Take your 32in x 60 in piece. Fold it in half so that the selvages are together and it is only 30 inches wide. Bring raw edges together. Your folded piece is now approximately 30in x 15in. Align on mat. Cut selvages off (if desired, because we have a bit of fabric to work with here). Measure 10 inches (this is what you may want to increase for a more roomy hood) from raw/unfolded edge. Cut. You now have TWO SIDE HOOD PIECES.

YOU'RE FINISHED CUTTING! YAY!
Okay, I lied. You're finished cutting fabric. Now you have to CUT ELASTIC.

Look, I did the math, so you don't have to (don't you love me?)
CUT THE FOLLOWING LENGTHS OF ELASTC:
4 @ 60 inch (Back & Side seams)
2 @ 50 inch (Center Front)
2 @ 120 inch (Gores)
2 @ 10 inch (Arm Holes)
2 @ 20 inch (Hood seams)
1 @ 30 inch (Hood front) *adjust if you decide to increase the width of the hood pieces*
1 @ 18 inch (Neck Band)
NOW ONTO THE SEWING!
1.) NARROW HEM the long sides of EVERY piece (these would normally be the seams in any other garment).
OR
If you're lucky enough to have an overlock/serger, NARROW HEM the HOOD PIECES ONLY and serge the rest of long sides of the rest of the pieces.
Don't worry about puckers or mess. The extreme ruching will hide these!
Several hours later... (just kidding, it only take about an hour or so... just seems like forever!)

2.) NARROW HEM bottom edge of all Cloak pieces, and top edge of all hood pieces.
3.) Let's start assembling by putting the gore into the side pieces first. Pin the elastic along the inside (the part you slashed) of the side piece, where the gore will be attached. You might have noticed that your fabric is TWICE AS LONG as your elastic. You can just sew and stretch the elastic as you go and hope for the best, but I like to mark it in several places by pinning the elastic to the fabric....
TO PIN: First pin the ends of the elastic to the ends of the fabric. Next find the middle of the elastic and the middle of the fabric (in this case, the top of the slash) and pin. Find halfway between the Middle Pin and the End Pin on one side for both the fabric and elastic. Pin together. Repeat for other side. Continue pinning until you are satisfied. I only used about 7 pins in this case.
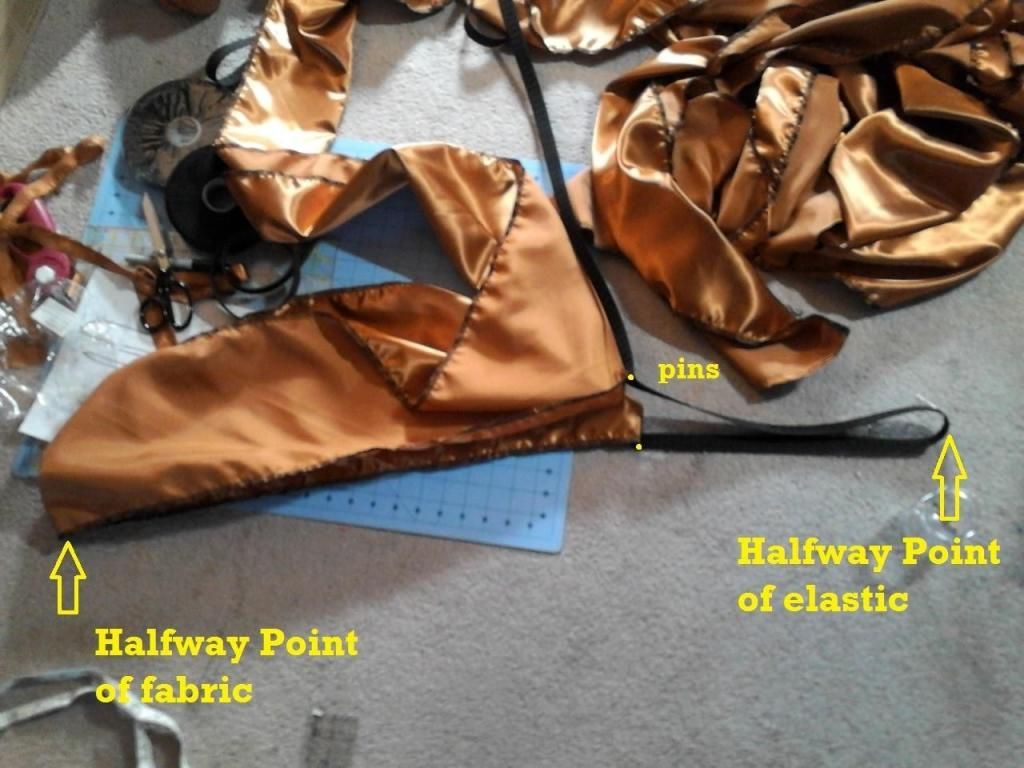 |
| Quick way to find the halfway point between to pinned spots. |
TO SEW: Make sure your needle is sunk into the fabric whenever you stop. Your feed-dogs will not work in this case, since you are stretching the elastic as far as it will go so that the fabric lies smoothly on top (I was lucky in that I guessed double-the-fabric to elastic length ratio and the elastic I got does actually stretch exactly double) and the pressure of your tugging on the fabric will yank the material right out of the machine and counter the feed dogs operation, because you are stronger than your precious little sewing machine. You will have to feed the fabric yourself, pulling the elastic taut with one hand and gripping the fabric behind (after) the needle and pulling gently, maintaining the rate at which your sewing machine operates. This is where being best friends with your sewing machine comes in handy. If you've spent a lot of time with your machine, you will instinctively know the rate at which it feeds for each stitch setting, and guide the fabric and elastic through without much issue. Pulling/Feeding it too quickly will place pressure on the needle, bending it and causing it to hit the needle plate and break. However, even if you have a bizarre mental bond with your sewing machine, you will probably still break a couple of needles in this project. Be patient!
Breaking it down more completely...
First, I place the end of the fabric and elastic (we are sewing from the fabric side, so the elastic is beneath the fabric) under the presser foot, and lock it down. Since we are at the edge of the fabric, there is nothing for us to grip to help feed the fabric through. So next, I bunch up some of the fabric on top of the elastic, without stretch the elastic yet, and sew about an inch. Now we have fabric to grip and help feed through the machine.


If you have more fabric than your elastic will stretch to accomodate, stop every so often (easiest at the end of sewing a segment), and bunch up/gather some of the fabric and sew to the elastic as we did in the very beginning.
 |
| Looking at finished seam from inside of cloak |
TO FINISH GORE: Take the gore piece and pin to the other edge of the elastic that you just sewed to the slashed part of the side pieces. Stretch and sew as before. The elastic should be laying against the right side (shiny side in the case of satin) or 'outside' of the cloak. The finished/narrow-hemmed edges of the fabric should be on the inside.
 |
| Finished Gore |
4.) Attach SIDES to BACK as you did with the gore.
5.) Attach FRONTS to SIDES. You will have one big piece that looks like this...

6.) Finish FRONTS. Lily Munster's cloak looks as if it tapers up, meaning the front pieces are 'shorter' at the center front. This is easily achieved simply by cutting a shorter piece of elastic. I went with 50inches instead of 60 inches, but I think I'd recommend going even shorter, since the back sort of trains out/drags on the ground and you want the center front up off the ground.
At any rate... First measure down from the shoulder to determine the desired finished length of the center front.


7.) Assembly HOOD as follows: Sew 20 inch (you could probably reduce this to 15 inches for better gathers and less awkward form in finished cloak) elastic between three segments of HOOD, stretching to fit as with the cloak pieces, elastic on the outside/right side of the fabric.


8.) Finish neck edges on cloak and hood by serging/overlocking or narrow hemming.
9.) ATTACH HOOD by first pinning elastic along neck edge of cloak. You will not need to stretch the elastic. Do not gather up or bunch fabric to the elastic either, along the front and back. The side pieces will need to be gathered to fit the remaining elastic length. Sew without stretching.

Pin bottom edge of hood to elastic, gathering up excess (you will have to gather a BUNCH, since we made the hood rectangular shaped, and hood are generally contour-shaped for a reason, ie to fit the neckline). Sew.
10.) Mark and Attach ties at centerfront. Her ties sit just above the bust, where you'd take an overbust measurement. I used black satin ribbon, sewing them to the underside of the elastic.
11.) ARMHOLES. Try on, mark position for armholes (they belong between the front piece and side piece). You could guess ahead of time and leave the gap when you sewed the front to the side pieces, but with all the gathering, this was more accurate for me. Take out stitching on SIDE PIECE(s).

12.) The satin fabric tends to curl out at the bottom so that the inside is exposed.

To correct this, TURN UNDER an inch or more (depending on desired length of cloak), and tack at elastic seams/ribs. I would suggest more than I did, since it obviously is still curling up in my costume photos. This also might not be such a big deal if a softer satin is used. Maybe give it a press with the iron, too.

13.) ROCK IT LILY MUNSTER STYLE!!

Damn, you're impressive. Really.
ReplyDelete^ I second what Ally says
ReplyDeleteThat's a GREAT tutorial and OMFG YOU ARE SO AMAZING I LOVE YOU YOU ARE MY HERO.
ReplyDeleteAhem. I mean, nice job. ;-)
way cool! that is awesome!
ReplyDeleteGreat costume cloak and dress! I love the richness of the cloak's colour.
ReplyDeletewhere did you buy the fabric??
ReplyDeleteHow much fabric did you buy in the beginning?
ReplyDeleteWow, I love these type of gothic cape. Really cool!!
ReplyDelete